
How to Operate a Car Lift: Safe Operating Guide for 2026
Learn how to operate a car lift safely with essential pre-checks, mechanical lock procedures, and vehicle balance tips updated for October 2026.
 By Christian Hazel
Updated October 10, 2026
By Christian Hazel
Updated October 10, 2026

Setting up an automotive workspace for undercarriage repair requires absolute confidence in your machinery and safety protocols. Learning how to operate a car lift correctly prevents catastrophic vehicle drops, expensive frame damage, and severe shop injuries. Whether you run a commercial repair bay or maintain vehicles on residential car lift options in your home garage, vehicle lifting demands strict operational discipline. Every lifting cycle involves balancing thousands of pounds of steel overhead, making proper staging and mechanical lock confirmation essential before turning a single wrench.
Modern automotive hoists rely on pressurized fluid and mechanical linkages, so understanding the distinct characteristics of hydraulic car lift systems ensures smooth, predictable raising and lowering. Skipping basic pre-operational inspections or misjudging a vehicle’s center of gravity can quickly turn routine maintenance into a hazardous situation. Taking time to master equipment safety checks, swing-arm pad positioning, and mechanical lock engagement protects both your vehicle and your workspace. This operational guide walks through every phase of the lifting procedure to keep your shop productive and secure.
| Award | Product | BJL Score About BJL ScoreThe BJL Score is our own rating from 0 to 10, based on performance, design and build, ease of use, and value. It reflects independent research and is never influenced by manufacturers, retailers, or affiliate commissions. Learn more › | |
|---|---|---|---|
| Best Overall |
WEIZE 11000lbs Two Post Car Lift
|
9.1/10 | Buy |
| Best Premium |
 KATOOL 1100lbs 2 Post Car Lift Truck Clear Floor
|
8.9/10 | Buy |
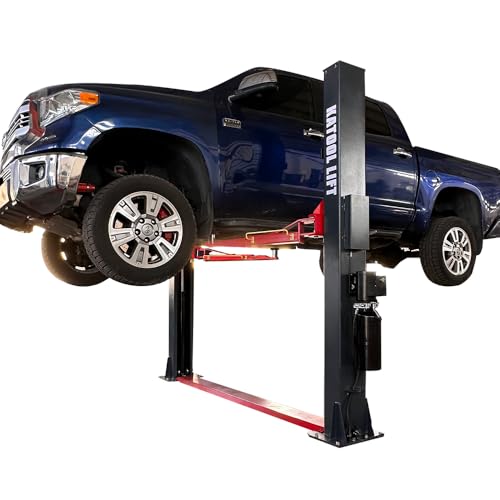 KATOOL 2 Post Lift 4.0HP 12000lbs Single Point
|
8.9/10 | Buy | |
| Best Budget |
 Albott 7000 LBS Portable Car Lift with Extension
|
8.6/10 | Buy |
 VEVOR Portable Car Lift, 4400 lbs Capacity
|
8.1/10 | Buy | |
 Albott 7000 lb Portable Car Lift with Extension
|
8.1/10 | Buy | |
| Best Value |
 ME 11000lbs Double S Design 2 Post Lift Car Lift
|
8.1/10 | Buy |
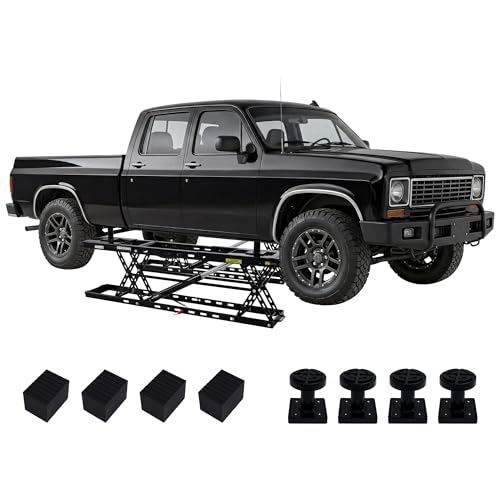 Albott 8000 LBS Portable Car Lift for Home Garage
|
7.8/10 | Buy |
Essential Protocols for Safe Vehicle Lift Operation
Operating a vehicle lift demands structured awareness from the moment you guide a car into the service bay until you clear the posts. Hydraulic hoists rely on enormous mechanical force, meaning an oversight during staging or raising can result in severe equipment damage or structural failure. Understanding the exact mechanical functions of your equipment turns a potentially dangerous task into an efficient, repeatable routine. Taking control of the process starts well before pressing the lift button on your power unit.
Pre-Operational Daily Inspection and Equipment Checks
A thorough visual inspection is the first operational step every technician should perform before using a lift. Check the floor around baseplates and power units for leaking hydraulic fluid, loose fittings, or damaged hoses. Inspect the steel equalization wire ropes and chain drives on models like the KATOOL 2-post lift to verify that cables seat properly inside sheaves. Look closely at arm restraint gear teeth to make sure they mesh firmly without rounded metal.
Operating controls also require quick verification prior to positioning a vehicle between the columns. Test the electrical push button and manual lowering valve lever to ensure responsive action without sticking springs. Check that mechanical lock release levers on both columns move freely and snap back under positive spring tension. On overhead models, confirm that the padded shutoff bar moves smoothly and trips the safety switch. Verifying these basic components protects you from unexpected mechanical failures during mid-lift cycles.
Vehicle Center of Gravity and Lift Point Alignment
Proper balance is the most critical safety factor when supporting a vehicle on a frame-engaging hoist. Most front-engine passenger cars carry a center of gravity positioned roughly below the front seats, while pickup trucks shift weight toward the heavy axles. When positioning a vehicle on symmetric hoists, such as the ME 11000lbs Double S Design lift, center the balance point midway between the columns. An asymmetric arm configuration positions the vehicle further rearward between posts, allowing driver doors to open easily without hitting uprights.
Never guess where to place lifting pads on the underside of a vehicle. Consult the manufacturer service manual or official lifting point guides to identify reinforced factory contact points. On modern unibody vehicles, these locations are reinforced pinch welds along rocker panels, while body-on-frame trucks feature solid boxed frame sections. Lifting a car by floor pans, steering linkages, or suspension control arms can puncture sheet metal or bend components. Aligning rubber pads directly beneath designated points provides stable weight distribution before vertical lifting begins.
Swing Arm Configuration and Height Adapter Setup
Adjusting telescoping arms and pad heights ensures that all four contact points touch the chassis simultaneously. Swing arms feature telescoping sections that adjust to match vehicle wheelbases and frame widths. For low-slung sports cars, hoists with low minimum pad heights around 4.25 inches allow pads to slide smoothly beneath low-clearance rocker panels. Verify that arm restraint gears unlock as arms swing flat against the ground and lock once carriages rise. This automatic restraint prevents arms from kicking outward if severe wrenching forces occur overhead.
Frame clearance variations on trucks and SUVs often require dedicated height adapters to reach recessed frame rails without crushing running boards. Units like the KATOOL hoists include drop-in extension adapter sets measuring 30mm, 100mm, or 120mm to bridge uneven gaps between frame rails. When servicing four-wheel-drive trucks, using frame cradle adapters prevents curved chassis tubes from slipping off flat pads. Never stack loose wooden blocks or makeshift spacers on lift pads, as loose blocks can split or slide under load. Always adjust screw-up pads or insert factory-approved steel extensions directly into arm receivers.
The Initial Raise and Mandatory Stability Shake Test
Once lifting pads sit directly beneath frame points, begin the lifting procedure with measured control. Depress the raise button on the hydraulic power unit just long enough to bring pads into firm contact with the chassis. Double-check all four pads to confirm they have not shifted off center or pinched brake lines, fuel lines, or wiring harnesses. Raise the vehicle approximately three to six inches off the floor so all four tires clear the slab. Release the raise button immediately at this low height to prepare for the mandatory stability check.
The stability test, commonly known among technicians as the bump test, is an indispensable safety procedure. Firmly grip the bumper or quarter panel of the vehicle and push downward and sideways with moderate body weight. The vehicle should remain rock-solid on lift pads without wobbling, slipping, or creaking. If you detect any rocking motion or pad slippage, lower the vehicle completely and reposition the swing arms. Operating machinery like heavy duty shop lifts requires zero tolerance for unstable loads, and catching a balance error early prevents disaster at full working height.
Setting the Vehicle on Mechanical Safety Locks
After confirming stability, depress the raise button to elevate the carriage toward your desired working height. As carriages rise along internal column tracks, you will hear a rhythmic, metallic clicking sound from both posts. This sound indicates that spring-loaded mechanical lock dogs are traveling past heavy-duty ladder rungs welded inside the columns. On hoists like the WEIZE 11000lbs model or KATOOL 4.0HP unit, 220V hydraulic power units elevate heavy vehicles steadily and quietly. Monitor overhead clearances continuously during ascent to ensure vehicle roofs do not contact garage door tracks, light fixtures, or rafters.
Never leave a vehicle suspended solely by hydraulic fluid pressure while working underneath it. Hydraulic seals, hose fittings, or internal cylinder valves can develop microscopic leaks that allow carriages to drift downward without warning. Once you reach target working height, release the electric raise button and pull the manual hydraulic lowering valve lever. This action lowers carriages slightly until mechanical safety latches drop firmly and squarely into the nearest ladder rungs. You will see the carriage settle slightly and feel the load transfer directly to the solid structural steel columns.
Safe Working Practices Under Elevated Vehicles
Working underneath thousands of pounds of elevated steel requires ongoing awareness of how maintenance tasks alter vehicle dynamics. Removing heavy driveline components, such as a cast-iron transmission or complete rear axle assembly, drastically changes the center of gravity. When substantial weight leaves one end of the chassis, the vehicle can tilt on lift pads and become unstable. To guard against sudden balance shifts, always position tall under-hoist support stands beneath the frame before loosening heavy driveline bolts. These screw-type utility stands provide essential stabilization while you apply high torque to stubborn fasteners.
Personal safety habits also protect technicians from injury while moving around the service bay. Always wear ANSI-approved safety glasses and sturdy work boots to guard against dropped tools and falling debris. Keep the bay floor clear of fluid spills, air hoses, extension cords, and creeper boards that could cause tripping hazards beneath the chassis. Avoid leaning heavy pry bars against lift posts or using lift arms as leverage points. If you need to perform major suspension alignments or exhaust fabrication, utilizing drive-on four-post parking platforms can offer an alternative, wheel-supported foundation for specific types of service work.
Disengaging Safety Locks and Lowering Procedures
Lowering an elevated vehicle requires a strict operational sequence to clear mechanical safety latches cleanly. Before touching controls, inspect the bay floor to make sure tools, oil drain tubs, and jack stands are removed from under the vehicle. Never attempt to disengage mechanical locks while the vehicle rests its full weight directly on lock rungs. First, push the electric raise button for two to three seconds to lift carriages slightly off safety catches. This brief upward movement relieves mechanical pressure from locking pawls so they can retract freely.
Next, disengage mechanical locks using either the single-point lever or dual-column manual releases depending on your model. Once locks are verified open, slowly depress the manual lowering valve lever on the hydraulic power unit. Control descent rates smoothly, watching both columns to confirm carriages lower evenly to the ground. Allow carriages to bottom out completely so rubber pads clear the chassis, then swing all four arms outward against the walls. Start the engine smoothly and back out slowly, checking side mirrors to maintain ample clearance past upright posts.
Operating Portable Mid-Rise and Scissor Lifts Safely
Portable scissor hoists and frame-engaging quick lifts operate under different structural principles than stationary two-post shop hoists. Compact systems like the Albott 7000 LBS or 8000 LBS portable lifts use dual hydraulic frames connected to a shared pump unit, making floor levelness exceptionally critical. Manufacturer specifications for these portable units state that operating on a slope greater than 4 degrees is unsafe. Always verify that your concrete floor is clean, flat, and free of cracks that could cause portable frames to twist. Using the recommended grade of hydraulic fluid, such as ISO VG 46 oil, ensures consistent fluid displacement across both scissor assemblies.
Descent mechanics on portable scissor units also require special operational knowledge. For example, Albott portable scissor frames require a minimum vehicle weight of approximately 220 pounds resting on pads to initiate descent when opening the release valve. If you test the hoist completely unloaded, internal return springs may not overcome cylinder seal friction, leaving the empty lift extended. Furthermore, manually operated mechanical lifts, such as the VEVOR 4400 lbs portable model, raise via a power drill or hand crank rather than an electric hydraulic pump. With these drill-driven hoists, never use an impact wrench on the drive screw, and always insert mechanical angle locking pins to secure tilt angles.
Troubleshooting Operational Glitches and Lift Irregularities
Recognizing operational irregularities early prevents minor mechanical misalignments from escalating into dangerous shop hazards. A common issue during lifting cycles is uneven carriage travel, where one side rises noticeably faster than the other. This condition almost always stems from slack or unbalanced steel equalization cables rather than hydraulic pressure differences. If one carriage clicks into safety rungs before the other, synchronization cables must be re-tensioned according to manufacturer specifications. Operating a two-post hoist with loose equalization cables puts severe torsional stress on carriages and can cause premature slider block binding.
Hydraulic performance glitches can also interrupt normal operation and require systematic diagnosis. If an electric motor hums but fails to raise a load, check fluid levels in the transparent reservoir. Low fluid levels cause hydraulic pumps to draw air into circuits, leading to jerky, shuddering lifting motions and noisy cavitation. Bleeding trapped air from cylinder bleed screws at the top of each column restores smooth fluid flow. If a mechanical lock release binds under lever pressure, check for road dirt, dried grease, or cable slack inside column tracks. Maintaining clean column channels, lubricating sheaves, and checking anchor bolt tightness maintains smooth, reliable operation year after year.
Mastering vehicle lift operation comes down to building consistent, repeatable safety habits on every single cycle. Taking the time to verify structural lift points, conducting the mandatory shake test, and resting the vehicle squarely on mechanical locks transforms undercar maintenance into a safe, controlled task. Always respect equipment load limits, follow manufacturer guidelines for your specific lift architecture, and keep your workspace clean and organized. When approached with patience and precision, operating your lift provides unmatched service access and confidence across every automotive repair project.
About the author
Christian Hazel is an automotive journalist with extensive experience covering four-wheel-drive vehicles, mechanical upgrades, and off-road equipment. His background includes technical reviews, installation features, and project-vehicle coverage, bringing useful context to equipment choices for trucks, Jeeps, and off-road enthusiasts.